이번 프로젝트에서는 한국 액티브 시니어를 위한 망곰이 지도를 만들었습니다.
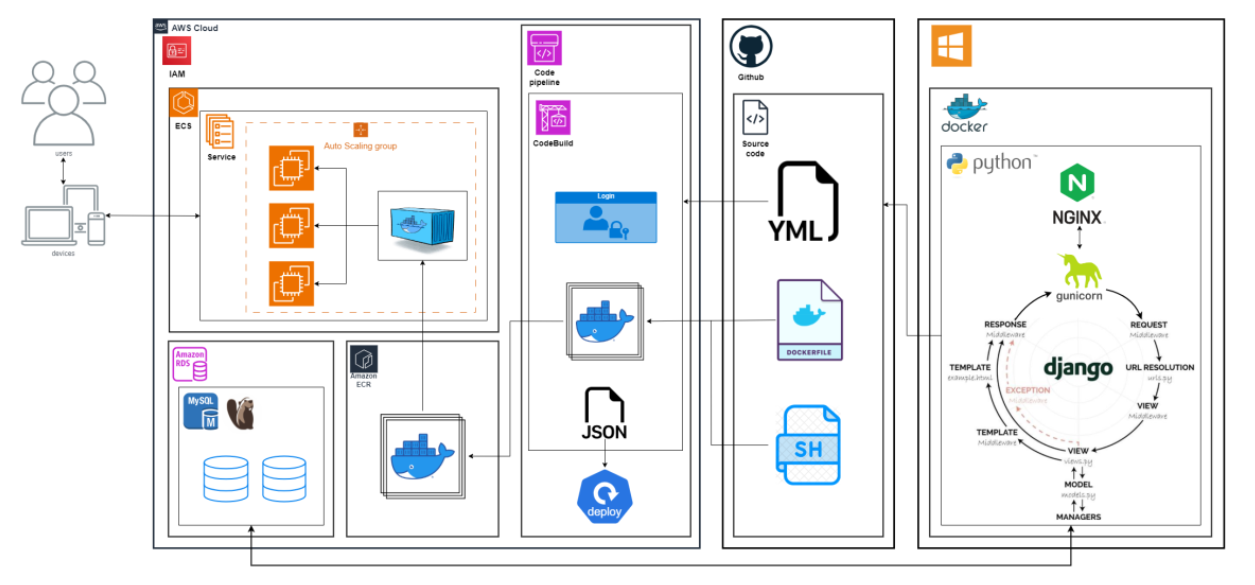
이번 프로젝트에서 맡은 역할은 메인 Django 구성을 통해 Main Page 구축 및 필요한 기능을 각 페이지마다 연결할 수 있도록 구현하였습니다. 그리고 AWS를 연결하다가 서버 주소는 열렸지만 연결하여 페이지가 나오지 않는 오류가 있었습니다.
그 부분의 경우 Docker Image가 제대로 되었는지 확인을 안 하고 서버를 구축해서 그런 것 같았습니다. 허브에 이미지를 올리고 그 이미지를 불러와지는지 확인을 하고 서버를 여는 방식으로 해결했습니다.
프런트앤드 작업과 페이지 간 연결을 하면서 병합을 하는 과정이 어려웠습니다. 연결을 하면서 page error를 많이 만나면서 페이지 간 병합하는 문제해결 능력을 향상할 수 있었던 것 같습니다.
[오류 및 아쉬운 점]
- AWS 연결 이슈 : 도커 이미지를 불러오지 못해 웹 접속 시 화면이 뜨지 않았음
- 해결: 도커 생성 파일 문제를 수정하여 코드빌드와 코드 파이프라인에 성공적으로 적용되었다.
- API 지도 이슈 : 지도가 뜨지 않음
- 해결 : 서비스 URL IP 변경으로 권한이 누락되어 권한을 부여함
- 프런트 팝업 이슈 : 팝업 한 개에 페이지 여러 개 두기
- 해결 : IMAGE, HEAD, P태그를 넘겨서 js에서 ', '를 기준으로 끊어서 배열로 페이지마다 전달함
- 데이터 이슈 : 통계청이 한 번 가공한 데이터여서 아쉬웠다. raw 데이터였으면 더 좋았을 텐데.. , 코로나로 인한 영향으로 인해 제대로 측정할 수 없어 아쉬웠다.
- 로딩창 이슈 : 뒤로 가기를 누르면 로딩이 무한 로딩이 된다 (차후 업데이트 예정)
https://github.com/SKNETWORKS-FAMILY-AICAMP/SKN03-2nd-3Team.git
GitHub - SKNETWORKS-FAMILY-AICAMP/SKN03-2nd-3Team: 코딩하는 망곰이들
코딩하는 망곰이들. Contribute to SKNETWORKS-FAMILY-AICAMP/SKN03-2nd-3Team development by creating an account on GitHub.
github.com
[워크플로우 및 아키텍처]

[Django 구성]
1. 프로젝트 시작 & user App 생성
django-admin startproject config .
django-admin startapp user
2. templates 폴더: html
3. static 폴더 : css, js, images 폴더에 각각의 소스 저장
[작성한 코드 리뷰]
1. urls.py / views.py
○ urls.py
● 메인, 설명, 지도, 개발진, 테스트 페이지 연결
○ views.py
● 각 페이지마다 request 하여 페이지를 반환하는 함수 구현
● getMap
- CulturalFacility : models.py 에서 정의해 준 클래스 모듈
- Paginator : 게시판 같은 목록을 주어져있을 때, 페이지당 보여주는 글(10개)을 지정 가능한 모듈
- try-except로 에러를 정의
- map.js에서 보낸 X-Requested-with를 서버가 AJAX로 인식하게 함 →
XMLHttpRequest랑 비교하여 동일할 경우 JsonResponse를 반환
* JsonResponse : HttpResponse의 subclass, JSON-encoded response 생성
response를 커스터 마이징 하여 전달하기 위해 사용하는 모듈
- 해당 context를 페이지에 전달(map.html)
○ models.py
● CulturalFacility 함수를 구현하여 views.py에서 사용
- user/urls.py
from django.urls import path
from .views import getMain, getDesc, getAboutus, getTest,getMap

urlpatterns = [
    path('', getMain, name="user-Main"),
    path('desc/', getDesc, name="user-Desc"),
    path('map/', getMap, name="user-Map"),
    path('aboutus/', getAboutus, name="user-Aboutus"),
    path('test/', getTest, name="user-Test")
]
- user/views.py
from django.shortcuts import render
from django.core.paginator import Paginator
from django.shortcuts import render
from django.http import JsonResponse
from .models import CulturalFacility

# Create your views here.
def getMain(request):
    return render(request, "user/main.html")

def getDesc(request):
    return render(request, "user/desc.html")

def getAboutus(request):
    return render(request, "user/aboutus.html")

def getTest(request):
    return render(request, "user/test.html")


# map
def getMap(request):
    page = request.GET.get('page', 1)

    try:
        page = int(page)
    except ValueError:
        page = 1  # 만약 페이지 번호가 유효하지 않다면 1페이지로 설정합니다.

    objects = CulturalFacility.objects.all().values()
    paginator = Paginator(objects, 25)  # 페이지당 10개의 객체

    try:
        page_obj = paginator.get_page(page)
    except:
        objects = []  # 만약 페이지 번호가 유효하지 않거나 페이지가 비어있다면 빈 리스트를 반환


    if request.headers.get('x-requested-with') == 'XMLHttpRequest':
        return JsonResponse({
            'shop_list': list(page_obj.object_list)
        }, safe=False)

    context = {
        "objects" : page_obj,
        "shop_list" : list(page_obj.object_list)

    }
    return render(request, 'user/map.html',context)
- models.py
from django.db import models

# Create your models here.
class CulturalFacility(models.Model):
    esntl_id = models.CharField(max_length=50, primary_key=True)
    mlsfc_nm = models.CharField(max_length=50)
    fclty_nm = models.CharField(max_length=100)
    ctprvn_nm = models.CharField(max_length=50)
    signgu_nm = models.CharField(max_length=50)
    fclty_road_nm_addr = models.CharField(max_length=200)
    lnm_addr = models.CharField(max_length=200)
    adit_dc = models.CharField(max_length=100, null=True)
    latitude = models.CharField(max_length=200, default=1)
    longitude = models.CharField(max_length=200, default=1)

    def __str__(self):
        return self.fclty_nm
2. 메인 페이지

○ main.html
● main.css / loading.css 연결
● <div id="loading-overlay> : images에 있는 loding.mp4 영상을 실행 자동 실행과 loop 걸기
● main.js / navi.js 연결
- templates/user/main.html
<!DOCTYPE html>
<html lang="en">
<head>
    <meta charset="UTF-8">
    <meta name="viewport" content="width=device-width, initial-scale=1.0">
    <title>ASWM</title>
    {% load static %}
    <link rel="stylesheet" href="{% static 'css/main.css' %}">
    <link rel="stylesheet" href="{% static 'css/loading.css' %}">
</head>
<body>
    <!-- 로딩 팝업 -->
    <div id="loading-overlay" class="loading-overlay">
        <div class="loading-popup">
            <video src="{% static 'images/loading.mp4' %}" autoplay muted loop></video>
        </div>
    </div>

    <div class="container">
        <div class="circle" id="desc-link">
            <img src="{% static 'images/description_icon.png' %}" alt="지도">
            <p>K-시니어 근황</p>
        </div>
        <div class="circle" id="map-link">
            <img src="{% static 'images/map_icon.png' %}" alt="지도">
            <p>지도</p>
        </div>

        <div class="circle" id="aboutus-link">
            <img src="{% static 'images/aboutus.png' %}" alt="지도">
            <p>망곰하는 코딩이들</p>
        </div>

        <div class="circle" id="test-link">
            <img src="{% static 'images/aboutus.png' %}" alt="지도">
            <p>누르면 귀여운게 나와요</p>
        </div>
    </div>


    <div class="center-content">
        <h1>ASWM</h1>
    </div>

    <div class="under-content">
        <p>Active Senior with Manggom</p>
    </div>

    <div class="footer">
        <p>망곰하는 코딩이들</p>
    </div>

    {% load static %}
    <script src="{% static 'js/main.js' %}"></script>
    <script src="{% static 'js/navi.js' %}"></script>
</body>
</html>
○ main.css / loading.css
● loading-popup : 로딩 팝업창 디자인에 radious를 50px로 주어 각진 부분을 둥글게
●. loading-overlay : 로딩창이 떴을 경우 background를 회색으로 하고 backdrop-filter에 blur를 줘서 흐리게 구성

- static/css/main.css
body, html {
    margin: 0;
    padding: 0;
    height: 100%;
    font-family: Arial, sans-serif;
    background: url('/static/images/background.png') no-repeat center center fixed;
    background-size: cover;
    position: relative;
    z-index: -1;
}

.container {
    display: flex;
    justify-content: center;
    align-items: center;
    height: 47%;
    position: relative;
    z-index: 1;
    padding-top: 10px;
    margin-bottom: -5%;
    gap: 13%;
}

.circle {
    text-align: center;
    cursor: pointer;
}

.circle img {
    width: 100px;
    height: 100px;
    border-radius: 50%;
    opacity: 0.9;
}

.circle p {
    margin-top: 10px;
    font-size: 25px;
    font-weight: bold;
}

.center-content {
    text-align: center;
    bottom: 70%;
    margin-bottom: 13%;
}

.center-content h1 {
    font-style: italic;
    font-weight: bold;
}

.under-content {
    text-align: center;
    font-style: italic;
    font-weight: bold;
}

.under-content p {
    color: red;
    font-size: 24px;
}

.footer p {
    text-align: right;
    position: absolute;
    bottom: 0;
    width: 100%;
    font-size: 24px;
    margin: 0;
    color: gray;
}
- static/css/loading.css
.loading-overlay {
    display: none;
    position: fixed;
    top: 0;
    left: 0;
    width: 100%;
    height: 100%;
    background: rgba(128, 128, 128, 0.5);
    backdrop-filter: blur(5px);
    justify-content: center;
    align-items: center;
    z-index: 1000;
}

/* 로딩 팝업 스타일 */
.loading-popup {
    width: 700px;
    height: 700px;
    background: white;
    border-radius: 50px;
    display: flex;
    justify-content: center;
    align-items: center;
    box-shadow: 0 0 15px rgba(0, 0, 0, 0.3);
    overflow: hidden;
}

.loading-popup video {
    width: 100%;
    height: 100%;
    object-fit: cover;
    border-radius: 50px;
}
○ 트러블 : main을 제외한 다른 페이지에서 뒤로 가기 버튼을 클릭하면 무한 로딩이 걸림
● 해결법 : 차 후 해결할 예정(페이지를 이동하는 navi.js를 수정하여야 할 것으로 보임)
○ main.js / navi.js
● main.js : page 이동 함수 구현
● navi.js
: 클릭 이벤트가 발생할 경우 처음에는 숨겨져 있는 id가 loading-overlay를 불러옴
로딩 팝업을 표시하는 함수 및 flex로 보이게 하기(timeout : 4000ms)
event.preventDefault() : 클릭 동작 막기
각 페이지마다 이름이 달라서 누른 버튼의 아이디를 받아서 해당 페이지로 넘김
* 차후 버튼 아이디도 받아서 하나의 함수로 구현하여 단순화 가능할 듯
- static/css/main.js
function navigateTo(page) {
    window.location.href = page;
}
- static/css/navi.js
document.addEventListener('DOMContentLoaded', function() {
    const loadingOverlay = document.getElementById('loading-overlay');

    // 로딩 팝업 표시 및 페이지 이동
    function handlePageTransition(url) {
        loadingOverlay.style.display = 'flex'; // 팝업 보이기
        setTimeout(function() {
            window.location.href = url; // 4초 후 페이지 이동
        }, 4000); // 4000ms = 4초
    }
    // desc.html
    document.getElementById('desc-link').addEventListener('click', function(event) {
        event.preventDefault(); // 기본 클릭 동작 방지
        handlePageTransition('/desc/'); // URL을 인자로 전달
    });
});

document.addEventListener('DOMContentLoaded', function() {
    const loadingOverlay = document.getElementById('loading-overlay');

    // 로딩 팝업 표시 및 페이지 이동
    function handlePageTransition(url) {
        loadingOverlay.style.display = 'flex'; // 팝업 보이기
        setTimeout(function() {
            window.location.href = url; // 4초 후 페이지 이동
        }, 4000); // 4000ms = 4초
    }
    //map.html
    document.getElementById('map-link').addEventListener('click', function(event) {
        event.preventDefault(); // 기본 클릭 동작 방지
        handlePageTransition('/map/'); // URL을 인자로 전달
    });
});

document.addEventListener('DOMContentLoaded', function() {
    const loadingOverlay = document.getElementById('loading-overlay');

    // 로딩 팝업 표시 및 페이지 이동
    function handlePageTransition(url) {
        loadingOverlay.style.display = 'flex'; // 팝업 보이기
        setTimeout(function() {
            window.location.href = url; // 4초 후 페이지 이동
        }, 4000); // 4000ms = 4초
    }
    //map.html
    document.getElementById('aboutus-link').addEventListener('click', function(event) {
        event.preventDefault(); // 기본 클릭 동작 방지
        handlePageTransition('/aboutus/'); // URL을 인자로 전달
    });
});

document.addEventListener('DOMContentLoaded', function() {
    const loadingOverlay = document.getElementById('loading-overlay');

    // 로딩 팝업 표시 및 페이지 이동
    function handlePageTransition(url) {
        loadingOverlay.style.display = 'flex'; // 팝업 보이기
        setTimeout(function() {
            window.location.href = url; // 4초 후 페이지 이동
        }, 4000); // 4000ms = 4초
    }
    //map.html
    document.getElementById('test-link').addEventListener('click', function(event) {
        event.preventDefault(); // 기본 클릭 동작 방지
        handlePageTransition('/test/'); // URL을 인자로 전달
    });
});
3. 가설 설명 및 분석 결과 페이지(desc)

○ desc.html
● header id="home-link" : a 태그를 통하여 main 페이지로 돌아가게 구현
● class="content-container" : 처음에는 보이지 않도록 설정하고 image와 text-container 만 보이게 구현
● id="popup-overlay" : 팝업은 js와 연결하여 팝업 내 페이지 이동 버튼과 h1, img, p 태그를 보이게 구성
- templates/user/desc.html
<!DOCTYPE html>
<html lang="en">
<head>
<meta charset="UTF-8">
<meta name="viewport" content="width=device-width, initial-scale=1.0">
<title>DESC</title>
{% load static %}
<link rel="stylesheet" href="{% static 'css/desc.css' %}">
</head>
<body>
<div class="main-container">
<header id="home-link">
<a href="/">
<h1>ASWM</h1>
</a>
</header>
<div class="content-container" data-images="{% static 'images/activesenior.jpg' %}"
data-h3="엑티브 시니어란?"
data-p="은퇴 이후 충분한 시간과 경제력을 가지고 소비/여가 생활을 활발하게 즐기면서 적극적이고 능동적으로 삶을 살아가는 5060세대">
<img src="{% static 'images/desc_icon.png' %}" class="content-image" alt="desc_icon">
<div class="text-container">
<h1 class="title">엑티브 시니어?</h1>
</div>
</div>
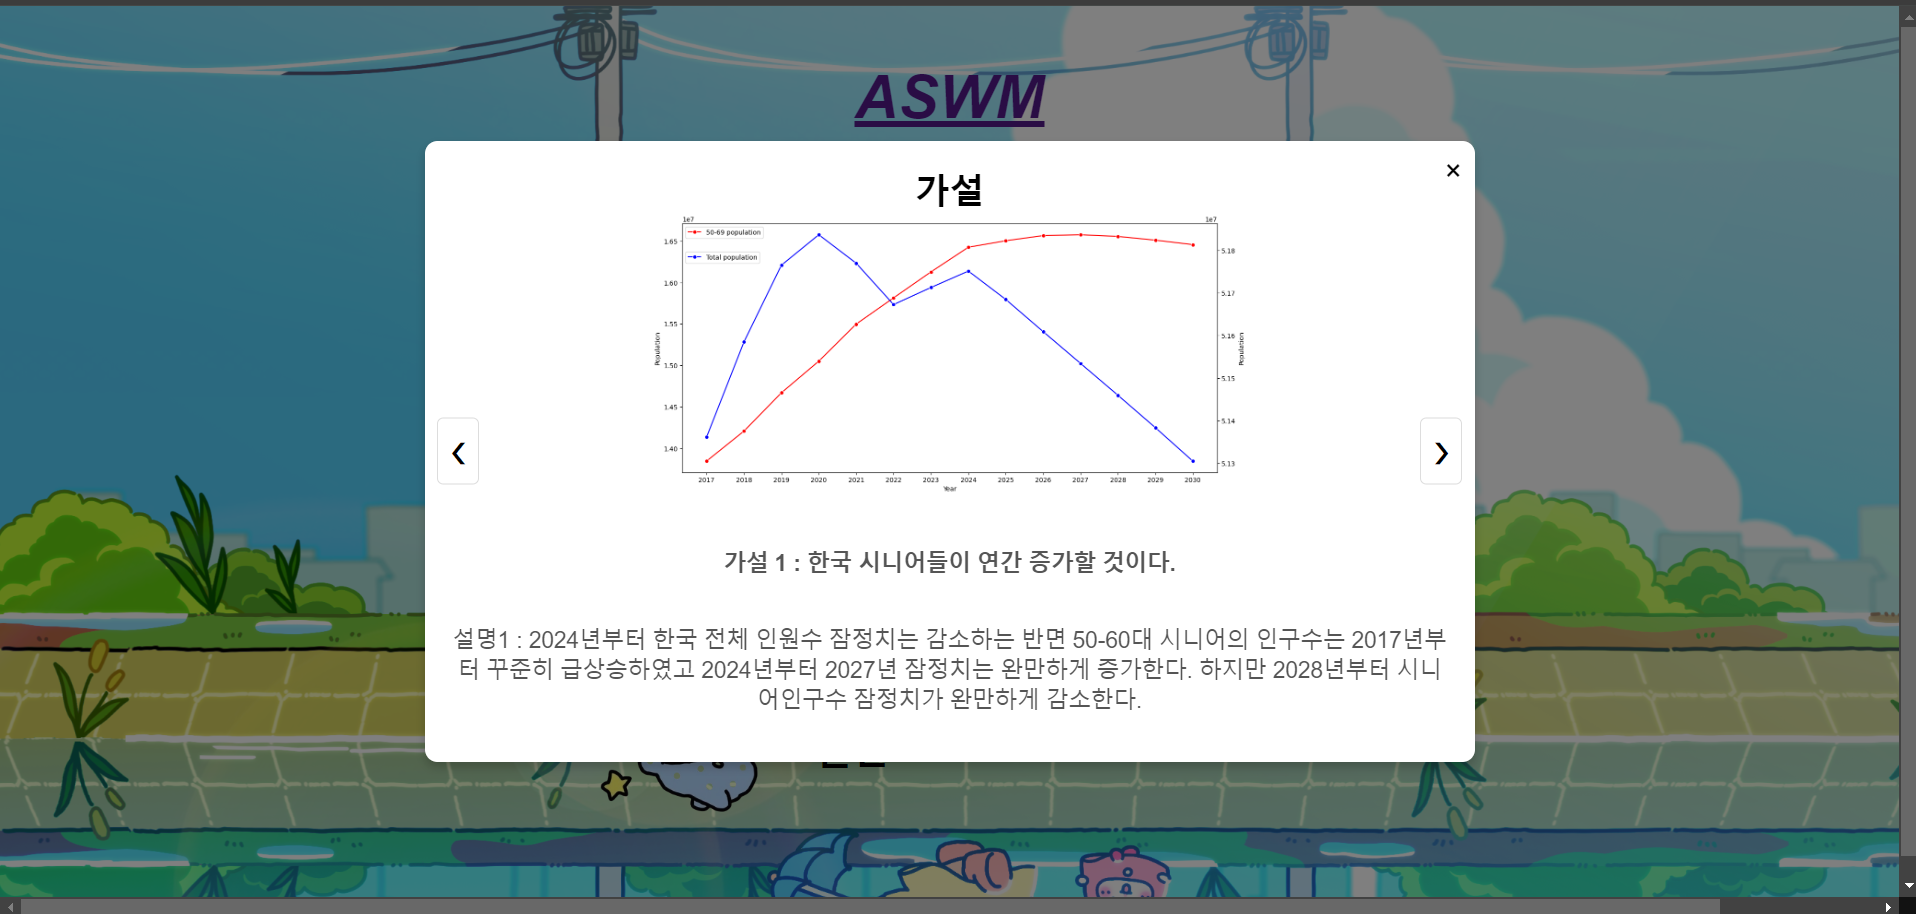
<div class="content-container" data-images="{% static 'images/hypothesis.png' %}, {% static 'images/hypothesis2.png' %},
{% static 'images/hypothesis3.png' %}"
data-h3="가설 1 : 한국 시니어들이 연간 증가할 것이다.
,가설 2 : 액티브 시니어들이 소비지출은 그외의 연령대보다 소비지출액이 높을 것이다.
,가설 3 : 액티브 시니어들의 문화지소비 비중이 그 외의 연령대에 비해 높을 것이다."
data-p="설명1 : 2024년부터 한국 전체 인원수 잠정치는 감소하는 반면 50-60대 시니어의 인구수는 2017년부터 꾸준히 급상승하였고 2024년부터 2027년 잠정치는 완만하게 증가한다. 하지만 2028년부터 시니어인구수 잠정치가 완만하게 감소한다.
,설명2 : 50대 가구는 소비지출액이 높게 나타났으나 60세 이상 가구는 소비지출액이 급격히 떨어지는 추세를 보인다.
,설명3 : 전체 소비지출 대비 문화소비 60대이상은 낮았고 50대는 높았다.">
<img src="{% static 'images/desc_icon_2.png' %}" class="content-image" alt="desc_icon">
<div class="text-container">
<h1 class="title">가설</h1>
</div>
</div>
<div class="content-container" data-images="{% static 'images/desc_icon_3.png' %}"
data-h3="결론 : 현재 우리나라의 50대는 액티브 시니어이고 60대는 액티브시니어로 보기 어렵다."
data-p="설명 : 우리나라 시니어층은 50대와 60대를 기준으로 극명하게 갈리며 그 중 50대는 소비지출액이 높고 활동적 소비를 하여 액티브시니어로 볼 수 있다. 하지만 60대이상의 인구는 소비 지출액이 적도 그 중 활동적 소비 비중 또한 낮다. 따라서 비액티브 시니어라고 보기 어렵다. ">
<img src="{% static 'images/desc_icon_3.png' %}" class="content-image" alt="desc_icon">
<div class="text-container">
<h1 class="title">결론</h1>
</div>
</div>
</div>
<!-- 팝업과 배경 -->
<div id="popup-overlay" class="popup-overlay">
<div id="popup" class="popup">
<span id="popup-close" class="popup-close">×</span>
<button id="popup-prev" class="popup-nav popup-prev">❮</button>
<button id="popup-next" class="popup-nav popup-next">❯</button>
<div class="popup-content">
<h1 id="popup-title" class="popup-title"></h1>
<img id="popup-image" class="popup-image" src="" alt="popup image">
<h3 id="popup-description-h3" class="popup-description-h3"></h3>
<p id="popup-description" class="popup-description"></p>
</div>
</div>
</div>
<script src="{% static 'js/desc.js' %}"></script>
</body>
</html>○ desc.css
●. popup-overlay : display를 none으로 하여 안 보이게 구성
●. popup : 팝업창의 border-radius를 10px로 주어 가장자리를 둥글게 구성
●. popup-close : 닫히는 구간을 구현(js에서 구현)
●. popup-nav : display를 none으로 하여 기본적으로 안 보이게 구현하고 있을 경우 prev, next를 호출
- static/css/desc.css
body {
    margin: 0;
    padding: 0;
    font-family: Arial, sans-serif;
    height: 100vh;
    display: flex;
    justify-content: center;
    align-items: center;
    background: url('/static/images/background.png') no-repeat center center fixed;
    background-size: cover;
}

header {
    text-align: center;
    font-style: italic;
    font-weight: bold;
    margin: 20px 0;
}

header h1 {
    font-size: 3em;
    font-family: Arial, sans-serif;
    margin: 0;
}

.main-container {
    display: flex;
    flex-direction: column;
    width: 100%;
    max-width: 1200px;
    align-items: center;
}

.content-container {
    display: flex;
    align-items: center;
    padding: 20px;
    width: 100%;
    max-width: 1200px;
    box-sizing: border-box;
    cursor: pointer;
    margin-bottom: 20px;
    margin-left: 50%;
}

.content-image {
    width: 150px;
    height: auto;
    margin-right: 20px;
}

.text-container {
    display: flex;
    flex-direction: column;
    justify-content: center;
}

.title {
    font-size: 32px;
    font-weight: bold;
    margin: 0;
}

.description {
    display: none;
    font-size: 15px;
    color: #555;
    margin-top: 10px;
}

.description-h3 {
    display: none;
    font-size: 25px;
    color: red;
    font-weight: bold;
    margin-top: 10px;
}

/* 팝업 배경 */
.popup-overlay {
    display: none;
    position: fixed;
    top: 0;
    left: 0;
    width: 100%;
    height: 100%;
    background: rgba(0, 0, 0, 0.5);
    justify-content: center;
    align-items: center;
}

/* 팝업 창 */
.popup {
    background: white;
    border-radius: 10px;
    padding: 20px;
    max-width: 800px;
    width: 80%;
    box-shadow: 0 4px 8px rgba(0, 0, 0, 0.2);
    position: relative;
    text-align: center;
}

/* 팝업 닫기 버튼 */
.popup-close {
    position: absolute;
    top: 10px;
    right: 10px;
    font-size: 24px;
    cursor: pointer;
}

/* 팝업 내비게이션 버튼 */
/* 팝업 내비게이션 버튼 */
.popup-nav {
    background: #fff;
    border: 1px solid #ddd;
    border-radius: 5px;
    padding: 10px;
    cursor: pointer;
    font-size: 24px;
    position: absolute;
    top: 50%;
    transform: translateY(-50%);
    z-index: 1000;
    display: none; /* 기본적으로 버튼을 숨김 */
}

.popup-prev {
    left: 10px;
}

.popup-next {
    right: 10px;
}

.popup-content {
    display: flex;
    flex-direction: column;
    align-items: center;
}

.popup-title {
    font-size: 28px;
    margin: 0;
}

.popup-image {
    max-width: 60%;
    height: 45%;
    margin-bottom: 20px;
    border-radius: 10px;
}

.popup-description-h3, .popup-description {
    font-size: 18px;
    color: #555;
    margin-top: 20px;
}
○ desc.js
● getElementById : html에서 각 div에 구성된 title, image, h3를 js에서 받아옴
● 트러블 : 글, 사진이 여러 개 존재하여 한 팝업 내의 여러 페이지를 구성하고 싶다.
* 해결 : images, h3 Texts, pTexts를 배열로 받아와서 팝업에서 여러 개의 페이지를 구성 가능하게 함
● forEach문으로 click 이벤트가 발생하면 h3, p 태그를 삼항연산자를 사용하여 배열로 변환
● updatePopupContent( ) : 기본 첫 페이지로 이동 가능하게 구현
● popupPrev, next : if문을 통해 페이지 이동을 구현
● popupOverlay : 외부 영역을 클릭했을 경우 팝업이 닫히도록 구성
- if(event.target === popupOverlay) : 사용자가 클릭한 요소가 event.target가 popupOverlay 그 자체인지 확인
- 조건이 참 일 경우 display 속성을 none으로 변경하여 팝업을 숨김
● updatePopupContent : 팝업 창의 내용을 동적으로 업데이트
- if(images.length >0) : images 배열이 하나 이상의 이미지를 가졌는지 확인
- popupImage.src = images [currentPage]
: images가 있다면 현재 페이지에 해당하는 이미지를 popupImage 요소에 설정
- popupDescriptionH3.textContent = h3 Texts [currentPage] || ''
popupDescription.textContent = pTexts [currentPage] || ''
: 현재 페이지에 해당하는 텍스트, 본문 텍스트를 가져와 popupDescriptionH3, popupDescription를 결정
만약 없다면 빈 문자열을 반환
- popupPrev.style.display = (images.length > 1)? 'block' : 'none';
popupNext.style.display = (images.length > 1)? 'block' : 'none';
: popupPrev, popupNext 버튼 표시 여부 결정 즉, 2개 이상의 이미지일 경우 block, 아닐 경우 none
[이미지나 텍스트가 1개인 경우(왼쪽) | 이미지나 텍스트가 2개 이상인 경우(오른쪽)]

- static/js/desc.js
document.addEventListener('DOMContentLoaded', function () {
    const items = document.querySelectorAll('.content-container');
    const popupOverlay = document.getElementById('popup-overlay');
    const popupTitle = document.getElementById('popup-title');
    const popupImage = document.getElementById('popup-image');
    const popupDescriptionH3 = document.getElementById('popup-description-h3');
    const popupDescription = document.getElementById('popup-description');
    const popupClose = document.getElementById('popup-close');
    const popupPrev = document.getElementById('popup-prev');
    const popupNext = document.getElementById('popup-next');
    let currentPage = 0;
    let images = [];
    let h3Texts = [];
    let pTexts = [];

    items.forEach(item => {
        item.addEventListener('click', function () {
            const title = this.querySelector('.title').textContent;
            const imageSrcs = this.getAttribute('data-images');
            const h3TextsStr = this.getAttribute('data-h3');
            const pTextsStr = this.getAttribute('data-p');

            popupTitle.textContent = title;

            // h3 및 p 태그 텍스트 배열로 변환
            h3Texts = h3TextsStr ? h3TextsStr.split(',').map(text => text.trim()) : [];
            pTexts = pTextsStr ? pTextsStr.split(',').map(text => text.trim()) : [];

            // 이미지 배열로 변환
            images = imageSrcs ? imageSrcs.split(',').map(src => src.trim()) : [];
            currentPage = 0;

            // 첫 페이지로 이동
            updatePopupContent();

            popupOverlay.style.display = 'flex';
        });
    });

    popupClose.addEventListener('click', function () {
        popupOverlay.style.display = 'none';
    });

    popupPrev.addEventListener('click', function () {
        if (images.length > 0) {
            currentPage = (currentPage - 1 + images.length) % images.length;
            updatePopupContent();
        }
    });

    popupNext.addEventListener('click', function () {
        if (images.length > 0) {
            currentPage = (currentPage + 1) % images.length;
            updatePopupContent();
        }
    });

    // 팝업 외부 영역 클릭 시 팝업 닫기
    popupOverlay.addEventListener('click', function (event) {
        if (event.target === popupOverlay) {
            popupOverlay.style.display = 'none';
        }
    });

    function updatePopupContent() {
        if (images.length > 0) {
            popupImage.src = images[currentPage];
            popupImage.style.display = 'block';
        } else {
            popupImage.style.display = 'none';
        }

        popupDescriptionH3.textContent = h3Texts[currentPage] || '';
        popupDescription.textContent = pTexts[currentPage] || '';

        // 버튼 표시 여부 결정
        popupPrev.style.display = (images.length > 1) ? 'block' : 'none';
        popupNext.style.display = (images.length > 1) ? 'block' : 'none';
    }
});
4. 지도 API 연결하여 지도를 보여주는 페이지
(map.html; 연결 역할을 수행하였으며, 코드를 분석만 하도록 하겠습니다)

○ 트러블 1 : 해당 지도 내용을 미리 만들어 둔 map.html에서 병합하는 과정에서 블록의 배치가 이상하게 나옴
● 해결법 : 크롬브라우저에서 개발자 도구를 열어서 css를 수정 후 확인하여 조정함
○ 트러블 2 : API를 이용하여 지도를 서버에 올렸지만 지도가 호출되지 않음
● 해결법 : AWS에 배포하는 과정에서 서비스 URL IP 변경되어 권한이 누락되어 권한을 부여함
○ map.html
● div class="button-list" : shop_list를 반복하여 HTML 버튼을 생성
● {% for shop in shop_list %} : shop_list 리스트를 순회하여 'shop' 객체에 대해 반복적으로 아래 HTML 코드 생성
● <button class="card-button" onclick="moveToMarker({{ forloop.counter0 }})">
- button : 각 상점을 나타내는 버튼을 생성
- onclick="moveToMarker({{ forloop.counter0 }})" : 버튼 클릭이 발생하였을 경우 moveToMarker js 함수 호출
- <div class="card-content"> : 가게 이름, 주소가 들어가는 콘텐츠 영역
- <h3>[{{shop.mlsfc_nm}}] {{shop.fclty_nm}}</h3>
* shop.mlsfc_nm : 가게의 분류명(카테고리)을 가져와 표시
* shop.fclty_nm : 가게 시설명 표시 "[분류명] 시설명" 형태로 출력
- <div class="card-footer"> : 가게 도로명 주소 표시
● var iconUrl = ["{% static 'images/manggom0.png' %}", "{% static 'images/manggom0.png' %}"];
- iconUrl 자바스크립트 변수 선언 및 두 개의 이미지 URL을 배열로 저장
- "{% static 'images/manggom0.png' %}" : Django의 static 템플릿 태그를 사용해 정적 파일의 URL 생성
- <script type= "text/javascript"> : src에 있는 네이버 지도 API를 입력하여 text 방식으로 주어 지도를 호출
- templates/user/map.html
<!DOCTYPE html>
<html lang="en">
<head>
    <meta charset="UTF-8">
    <meta name="viewport" content="width=device-width, initial-scale=1.0">
    <title>Map Page</title>
    <script type="text/javascript" src="Input your API Key"></script>
    {% load static %}
    <link rel="stylesheet" href="{% static 'css/map.css' %}">
</head>
<body>
    <div class="container-2">
        <header id = "home-link">
            <a href="/">
                <h1>ASWM</h1>
            </a>
        </header>

        <div class="container-3">
            <div class="map-container">
                    <!-- 여기에 지도를 넣으세요 -->
                <div id="map"></div>
            </div>
            <div class="list-container">
                <h2>Location List</h2>
                <div class="button-list">
                    {% for shop in shop_list %}
                        <!-- <button onclick="moveToMarker({{ forloop.counter0 }})">{{shop.fclty_nm}}</button> -->

                    <button class="card-button" onclick="moveToMarker({{ forloop.counter0 }})">
                        <div class="card">
                                <!-- <div class="card-image">
                                    <img src="image_url.jpg" alt="청계천">
                                </div> -->
                            <div class="card-content">
                                <h3>[{{shop.mlsfc_nm}}] {{shop.fclty_nm}}</h3>
                                <div class="card-footer">
                                    <span>{{shop.fclty_road_nm_addr}}</span>
                                </div>
                            </div>
                        </div>
                    </button>
                    {% endfor %}
                </div>
            </div>
        </div>

        <div class="footer">
            <p>망곰하는 코딩이들</p>
        </div>
    </div>
    <script>
        var iconUrl = ["{% static 'images/manggom0.png' %}","{% static 'images/manggom0.png' %}"];
    </script>
    <script type="text/javascript">
        var map_url = "{% url 'user-Map' %}";
    </script>
    <script>
        const shops_list = {{shop_list|safe}};
    </script>
    {% load static %}
    <script src="{% static 'js/map.js' %}"></script>
</body>
</html>
○ map.css
- static/css/map.css
body, html {
    margin: 0;
    padding: 0;
    height: 100%;
    font-family: Arial, sans-serif;
    background: url('/static/images/background.png') no-repeat center center fixed;
    background-size: cover;
    position: relative;
    z-index: -1;
}

.container-2 {
    display: flex;
    flex-direction: column;
    height: auto;
}

header {
    text-align: center;
    font-style: italic;
    font-weight: bold;
    margin: 20px 0;
}

header h1 {
    font-size: 3em;
    font-family: Arial, sans-serif;
    margin: 0;
}

.container-3 {
    display: flex;
    width: 120vh;
    height: 80vh; /* Viewport height */
    margin-left: 23%;
}

.map-container {
    flex: 4; /* 80% */
    position: relative;
}

.list-container {
    flex: 1; /* 20% */
    background-color: #e3e3e3;
    overflow-y: auto;
    padding: 10px;
    box-sizing: border-box; /* 패딩을 포함하여 크기를 계산 */
}

.button-list {
    display: flex;
    flex-direction: column;
    gap: 10px; /* 버튼 간격 */
}

.button-list button {
    padding: 10px;
    background-color: #4CAF50; /* 버튼 배경색 */
    color: white; /* 버튼 글자색 */
    border: none;
    border-radius: 5px;
    cursor: pointer;
    text-align: left; /* 버튼 내 텍스트를 왼쪽 정렬 */
}

.button-list button:hover {
    background-color: #45a049; /* 버튼에 마우스를 올렸을 때 색상 */
}

#map {
    width: 100%;
    height: 100%;
}

.card-button {
    display: block;
    border: none;
    padding: 0;
    margin: 0;
    background-color: transparent;
    cursor: pointer;
    width: 100%;
    text-align: left;
}

.card-button .card {
    display: flex;
    border: 1px solid #ddd;
    border-radius: 8px;
    overflow: hidden;
    font-family: Arial, sans-serif;
}

.card-button .card-image img {
    width: 100px;
    height: 100px;
    object-fit: cover;
}

.card-button .card-content {
    padding: 10px;
    flex: 1;
}

.card-button .card-content h3 {
    margin: 0;
    font-size: 16px;
    font-weight: bold;
}

.card-button .card-content p {
    margin: 5px 0;
    font-size: 14px;
    color: #555;
}

.card-button .card-footer {
    font-size: 12px;
    color: #000;
}

.footer p {
    text-align: right;
    position: relative;
    width: 100%;
    font-size: 24px;
    color: gray;
    margin: auto;
}
○ map.js
● var seoul : 객체 seoul을 정의하고 지리적 경계를 나타내는 GeoJSON형식의 데이터 및 스타일 속성 정보 포
* GeoJSON : JSON 기반으로 지리적 데이터 구조를 인코딩하는 형식
(World Geodetic System 1984 & 십진도수 단위 사용)
- type : FeatureCollecton: 여러 지리적 'Feature'를 포함하는 객체
- features : 여러 Feature 객체를 포함, 하나의 Feature만 정의
- bbox(Coordinates) : 배열로 지리적 영역의 경계 상자를 나타냄(남서쪽, 북동쪽 좌표) 정의
- Properties : 폴리곤과 관련된 추가 속성정의
* "crs" : 'epsg:4326" : 사용하는 CRS (좌표 참조시스템)
* "admcode" : "1100000000" : 서울 행정 코드
* "level" : 3 : 폴리곤 표시 줌 레벨
● naver.maps.Event.once(map, 'init', function(e)) : map 객체가 초기화될 때 한 번만 실행하는 이벤트 리스너
- init을 통해 한 번만 실행될 콜백함수
- var mantle_properties = feature.geometryCollection [0]. getRaw(). mantle_properties;
* mantle_properties 객체의 모든 속성을 styleOptions 객체로 복사
- return styleOptions : 콜백함수가 styleOptions 객체를 반환하여 각 feature의 스타일(mantle_properties)로 적용
- map.data.addGeoJson(seoul, true) : 객체 seoul에 정의된 GeoJSON 데이터를 지도에 추가
● function addMarker(shop) : 지도에 마커를 추가하고, 마커를 클릭할 경우 Infowindow를 표시하는 기능 구현
- var urlMarker = new naver.maps.Markers(...)
* 새로운 마커 생성, position에 위치 정의하고 latitude(위도), longitude(경도) 사용하여 위치 설정
* animation : 드롭 애니메이션 실행되도록 설정
- index = index + 1; index = index % 2; : html에서 정의한 이미지를 번갈아가며 마커에 할당
- markers.push(urlMarker) : 생성된 마커를 markers 배열에 추가(모든 마커를 추적하기 위한 수단)
- var contentString1 = [...]. join(''); : Infowindow의 내용(contentString1)을 HTML 문자열로 정의
- var infowindow = new naver.maps.InfoWindow({... });
* content : Infowindow에 표시될 내용 설정. contentString을 사용
* anchorSize & anchorSkew : Infowindow 엥커 크기 설정 및 기울어짐 설정
● function loadMoreObjects()
: 스크롤 이벤트가 발생할 때마다 서버에서 추가 데이터를 비동기적으로 가져오고 마커를 추가하며
리스트에 해당 테이터 표시하는 기능 구현
- const listContainer = document.querySelector('. list-container')
*. list-container 클래스를 가진 DOM 요소를 선택해 listContainer 변수에 저장(스크롤 이벤트 감지)
-fetch('${map_url}? page=${page}', {... })
* fetch 함수는 지정된 URL(map_url)에 대해 GET 요청
* headers: { "X-Requested-With": "XMLHttpRequest" }
: X-Requested-With을 추가하여 서버가 이 요청이 AJAX 요청임을 인식
-. then(response => {... }) : 서버로부터 응답 처리(성공적인 응답일 경우 JSON 데이터 반환)
- .then(data => { ... }) : 서버에서 받은 데이터 처리
* 서버에서 반환된 shop_list가 비어있지 않으면 리스트에 추가
- data['shop_list'].forEach(function(shop, index) { ... })
* button.onclick = function() { ... } : 버튼 클릭 시 해당 'shop' 에 맞는 마커로 지도가 이동하는 기능
* moveToMarker(index + (currentPage - 1) * 25); : 마커로 이동할 때 인덱스 조정하여 페이지에 맞게 마커 선택
- .catch(error => { ... }) : fetch 요청에서 발생 가능한 오류를 처리(네트워크 | 응답 처리 중 발생한 오류 콘솔 출력)
- .finally(() => { page++; }) : page 변수를 1 증가시켜 다음 요청에서 다음 페이지 데이터를 가져오도록 함
- static/js/map.js
var seoul ={
    "type": "FeatureCollection",
    "features": [{
        "type": "Feature",
        "bbox": [126.76620435615891, 37.42829747263545, 127.18353917024454, 37.7010174173061],
        "geometry": {
            "__geometryId": "gangwon",
            "type": "Polygon",
            "mantle_properties": {
                "strokeColor": "green",
                "strokeOpacity": 0.7,
                "strokeWeight": 2,
                "strokeStyle": "solid",
                "strokeLineCap": "butt",
                "strokeLineJoin": "miter",
                "fillColor": "green",
                "fillOpacity": 0.2,
                "visible": true,
                "clickable": false,
                "zIndex": 0,
                "overlayType": "Polygon"
            },
            "coordinates": [
                [
                    [127.0198273, 37.7010174],
                    [127.0324142, 37.6918389],
                    [127.0486319, 37.6940629],
                    [127.0518035, 37.6858135],
                    [127.0633864, 37.6949219],
                    [127.0959959, 37.689071],
                    [127.0926947, 37.6485799],
                    [127.1111549, 37.6425634],
                    [127.1040662, 37.6216531],
                    [127.115715, 37.6196343],
                    [127.1184769, 37.6076128],
                    [127.1011437, 37.5760709],
                    [127.1049292, 37.5564216],
                    [127.1771461, 37.5811984],
                    [127.1819954, 37.5609924],
                    [127.1835391, 37.5451703],
                    [127.1631782, 37.5450174],
                    [127.1406196, 37.5155887],
                    [127.1411764, 37.5054302],
                    [127.1613903, 37.5002014],
                    [127.1585899, 37.4896011],
                    [127.1168965, 37.4586387],
                    [127.1043417, 37.4621729],
                    [127.0878556, 37.4448924],
                    [127.0721389, 37.4422612],
                    [127.0709529, 37.4302112],
                    [127.0523246, 37.4282974],
                    [127.0356919, 37.4391453],
                    [127.0346933, 37.4641548],
                    [127.0145096, 37.4548612],
                    [127.0036753, 37.4677203],
                    [126.9745795, 37.4544128],
                    [126.9629429, 37.4402804],
                    [126.9386219, 37.4360285],
                    [126.9283987, 37.4502126],
                    [126.9029875, 37.4340675],
                    [126.8683489, 37.4951078],
                    [126.8449551, 37.4734723],
                    [126.8146285, 37.4746494],
                    [126.8235871, 37.4877424],
                    [126.8130123, 37.4964006],
                    [126.8288372, 37.5265085],
                    [126.8221212, 37.5406778],
                    [126.8034927, 37.5430909],
                    [126.7944251, 37.5358288],
                    [126.7918192, 37.5437462],
                    [126.7662043, 37.5542423],
                    [126.7936954, 37.5815938],
                    [126.8025814, 37.6050327],
                    [126.8536318, 37.5717904],
                    [126.8762605, 37.5781852],
                    [126.8854099, 37.5938826],
                    [126.8996438, 37.5898169],
                    [126.9122798, 37.6443153],
                    [126.904802, 37.649201],
                    [126.9241229, 37.6461062],
                    [126.9475648, 37.6592153],
                    [126.9571081, 37.6528372],
                    [126.959803, 37.6297308],
                    [126.9755798, 37.6317525],
                    [126.9850845, 37.6373144],
                    [126.9796583, 37.6560386],
                    [126.9940175, 37.6667831],
                    [126.9921978, 37.6796269],
                    [127.0086637, 37.6844495],
                    [127.0096664, 37.6966998],
                    [127.0198273, 37.7010174]
                ]
            ]
        },
        "properties": {
            "crs": "epsg:4326",
            "admcode": "1100000000",
            "navercode": "09",
            "area0": "kr",
            "area1": "서울특별시",
            "area2": "",
            "area3": "",
            "area4": "",
            "meterPerPixel": "512",
            "level": 3
        }
    }]
}

var map = new naver.maps.Map(document.getElementById('map'), {
    zoom: 11,
    mapTypeId: 'normal',
    center: new naver.maps.LatLng(37.566205021936, 126.97770627907)
});

naver.maps.Event.once(map, 'init', function(e) {
    map.data.setStyle(function(feature) {
        var mantle_properties = feature.geometryCollection[0].getRaw().mantle_properties;
        var styleOptions = {
            ...mantle_properties,
        };
        return styleOptions;
    });

    map.data.addGeoJson(seoul, true);
});

//////////////////////////////////////////////////
let markers = []
let infoWindows = [];
let index = 0

function addMarker(shop){
    var urlMarker = new naver.maps.Marker({
        position: new naver.maps.LatLng(shop['latitude'], shop['longitude']),
        map: map,
        title: 'urlMarker',
        icon: iconUrl[index],
        animation: naver.maps.Animation.DROP
    });
    index = index +1;
    index = index % 2;
    markers.push(urlMarker);

    var contentString1= [
        '<div class="iw_inner">',
        `   <h3>${shop.fclty_nm}</h3>`,
        `   <p>${shop.fclty_road_nm_addr} | ${shop.lnm_addr}`,
        `       ${shop.mlsfc_nm}<br>`,
        '   </p>',
        '</div>'
    ].join('');


    var contentString = `
    <div class="infowindow-content" style="
        padding: 10px;
        border-radius: 10px;
        background-color: white;
        border: 1px solid #ccc;
        box-shadow: 0 2px 5px rgba(0,0,0,0.3);
    ">
        <h4 style="margin: 0; padding: 0 0 10px 0; font-size: 16px;">[${shop.mlsfc_nm}] ${shop.fclty_nm}</h4>
        <p style="margin: 0; font-size: 14px;">${shop.fclty_road_nm_addr}</p>
    </div>
    `;


    var infowindow = new naver.maps.InfoWindow({
        content: contentString,
        anchorSize: new naver.maps.Size(30, 30),
        anchorSkew: true
    });
    infoWindows.push(infowindow);  // InfoWindow를 배열에 추가

    naver.maps.Event.addListener(urlMarker, 'click', function() {
        if (urlMarker.getAnimation() !== null) {
            urlMarker.setAnimation(null);
        } else {
            urlMarker.setAnimation(naver.maps.Animation.BOUNCE);
        }

        if (infowindow.getMap()) {
            infowindow.close();
        } else {
            infowindow.open(map, urlMarker);
        }
    });
}

for (var shop of shops_list) {
    addMarker(shop);
    // 추가 작업 수행 가능
}

function moveToMarker(index) {
    var marker = markers[index];
    var position = marker.getPosition();
    map.setCenter(position);
    map.setZoom(15);  // 특정 위치로 이동 시 확대 레벨 조정

    // 모든 InfoWindow를 닫고 선택된 마커의 InfoWindow 열기
    infoWindows.forEach(iw => iw.close());
    infoWindows[index].open(map, marker);

    // 마커 클릭 효과 (아이콘 변경 및 애니메이션 활성화)
    markers.forEach((m, i) => {
        // 클릭된 마커에 애니메이션 설정
        if (i === index) {
            m.setAnimation(naver.maps.Animation.BOUNCE);
        } else {
            m.setAnimation(null);
        }
    });
}

const listContainer = document.querySelector('.list-container');  // .list-container 요소 선택
var page = 2;
function loadMoreObjects() {
    fetch(`${map_url}?page=${page}`, {
        method: "GET",
        headers: {
            "X-Requested-With": "XMLHttpRequest"  // 서버가 요청을 AJAX로 인식하게 하는 헤더
        }
    })
    .then(response => {
        if (!response.ok) {
            throw new Error('Network response was not ok');
        }
        return response.json();
    })
    .then(data => {
        console.log(data);
        if (data['shop_list'].length > 0) {
            const buttonList = document.querySelector('.button-list');
            const currentPage = page;
            data['shop_list'].forEach(function(shop, index) {
                addMarker(shop);
                const button = document.createElement('button');
            button.className = 'card-button';
            button.onclick = function() {
                moveToMarker(index + (currentPage - 1) * 25);  // 페이지에 맞춰 인덱스 조정
            };

            // 카드 요소 생성
            const card = document.createElement('div');
            card.className = 'card';

            // 카드 내용 생성
            const cardContent = document.createElement('div');
            cardContent.className = 'card-content';

            // 제목 생성
            const title = document.createElement('h3');
            title.innerHTML = `[${shop.mlsfc_nm}] ${shop.fclty_nm}`;

            // 푸터 생성
            const footer = document.createElement('div');
            footer.className = 'card-footer';

            const address = document.createElement('span');
            address.textContent = shop.fclty_road_nm_addr;

            // 푸터에 주소 추가
            footer.appendChild(address);

            // 카드 내용에 제목과 푸터 추가
            cardContent.appendChild(title);
            cardContent.appendChild(footer);

            // 카드에 카드 내용 추가
            card.appendChild(cardContent);

            // 버튼에 카드 추가
            button.appendChild(card);

            // 버튼을 리스트에 추가
            buttonList.appendChild(button);
            });

        } else {
            listContainer.removeEventListener('scroll', onScroll);  // 더 이상 로드할 객체가 없을 때 스크롤 이벤트를 제거합니다.
        }
    })
    .catch(error => {
        console.error('There was a problem with the fetch operation:', error);
    })
    .finally(() => {
        page++;
    });
}

function onScroll() {
    // list-container의 스크롤이 끝에 도달했을 때
    console.log('scroll');
    if (listContainer.scrollTop + listContainer.clientHeight >= listContainer.scrollHeight - 1) {
        console.log('End of scroll, loading more objects...');
        loadMoreObjects();
    }
}

// .list-container에 스크롤 이벤트 리스너 추가
listContainer.addEventListener('scroll', onScroll);
5. 참여자 페이지 (aboutus.html)

○ aboutus.html
- templates/user/aboutus.html
<!DOCTYPE html>
<html lang="en">
<head>
    <meta charset="UTF-8">
    <meta name="viewport" content="width=device-width, initial-scale=1.0">
    <title>About Us</title>
    {% load static %}
    <link rel="stylesheet" href="{% static 'css/aboutus.css' %}">
</head>
<body>
    <header id = "home-link">
        <a href="/">
            <h1>ASWM</h1>
        </a>
    </header>

    <div class="container">
        <div class="circle">
            <img src="{% static 'images/1.png' %}" alt="yeongyu">
            <p>팀원1</p>
        </div>

        <div class="circle">
            <img src="{% static 'images/2.png' %}" alt="songeun">
            <p>팀원2</p>
        </div>

        <div class="circle">
            <img src="{% static 'images/3.png' %}" alt="jongsik">
            <p>팀원3</p>
        </div>

        <div class="circle">
            <img src="{% static 'images/4.png' %}" alt="joowon">
            <p>팀원4</p>
        </div>

        <div class="circle">
            <img src="{% static 'images/5.png' %}" alt="jiwon">
            <p>팀원5</p>
        </div>
    </div>
</body>
</html>
○ aboutus.css
- static/css/aboutus.css
body, html {
    margin: 0;
    padding: 0;
    height: 100%;
    font-family: Arial, sans-serif;
    background: url('/static/images/background.png') no-repeat center center fixed;
    background-size: cover;
    position: relative;
    z-index: -1;
}

header {
    text-align: center;
    font-style: italic;
    font-weight: bold;
    margin: 20px 0;
}

header h1 {
    font-size: 3em;
    font-family: Arial, sans-serif;
    margin: 0;
}


.container {
    display: flex;
    justify-content: center;
    align-items: center;
    height: 47%;
    position: relative;
    z-index: 1;
    padding-top: 10px;
    margin-bottom: -5%;
    gap: 8%;
}

.circle {
    text-align: center;
    cursor: pointer;
}

.circle img {
    width: 100px;
    height: 100px;
    border-radius: 50%;
    opacity: 0.9;
}

.circle p {
    margin-top: 10px;
    font-size: 25px;
    font-weight: bold;
}

.center-content {
    text-align: center;
    bottom: 70%;
    margin-bottom: 13%;
}

.center-content h1 {
    font-style: italic;
    font-weight: bold;
}
6. 대망의 망곰이 사진 돌려돌려 돌림판 페이지(귀여워서 넣어둔 기능)
○ test.html
● .satellites 클래스 : 이미지 배열하기 + CSS를 통해 스타일링
● 각 이미지마다 인라인 스타일과 --i 라는 CSS variable 이 추가
● 각 요소가 Y축 기준으로 몇 deg만큼 회전할 지는 이것을 기준으로 함
● 각 이미지마다 top을 주어 위아래로 흩어져 있도록 구성
[사용 코드 링크]
https://solo5star.tistory.com/24
CSS로 3D 회전하는 효과 만들기
리뉴얼 된 블로그로 보기: https://solo5star.dev/posts/24/ 웹 페이지: https://solo5star.github.io/web-introduction 소스코드: https://github.com/solo5star/web-introduction 우아한테크코스에서 미션이 도착하였습니다! 프론
solo5star.tistory.com
- templates/user/test.html
<html lang="ko">
<head>
    <meta charset="UTF-8">
    {% load static %}
    <link rel="stylesheet" href="{% static 'css/test.css' %}">
    <title>test</title>
</head>
<body>
    <header id = "home-link">
        <a href="/">
            <h1>ASWM</h1>
        </a>
    </header>
    <div class="satellites">
        <img class="satellite" style="--i: 0; top: 80px" src= "{% static 'images/1.png' %}">
        <img class="satellite" style="--i: 20; top: 30px" src= "{% static 'images/2.png' %}">
        <img class="satellite" style="--i: 40; top: 120px" src= "{% static 'images/3.png' %}">
        <img class="satellite" style="--i: 60; top: 70px" src= "{% static 'images/4.png' %}">
        <img class="satellite" style="--i: 80; top: 10px" src= "{% static 'images/5.png' %}">
        <img class="satellite" style="--i: 100; top: 90px" src= "{% static 'images/aboutus.png' %}">
        <img class="satellite" style="--i: 120; top: 40px" src= "{% static 'images/culture_icon.png' %}">
        <img class="satellite" style="--i: 140; top: 30px" src= "{% static 'images/desc_icon_2.png' %}">
        <img class="satellite" style="--i: 160; top: 20px" src= "{% static 'images/desc_icon_3.png' %}">
        <img class="satellite" style="--i: 180; top: 90px" src= "{% static 'images/desc_icon.png' %}">
        <img class="satellite" style="--i: 200; top: 110px" src= "{% static 'images/description_icon.png' %}">
        <img class="satellite" style="--i: 220; top: 20px" src= "{% static 'images/map_icon.png' %}">
        <img class="satellite" style="--i: 240; top: 70px" src= "{% static 'images/park_icon.png' %}">
        <img class="satellite" style="--i: 260; top: 80px" src= "{% static 'images/study_icon.png' %}">
        <img class="satellite" style="--i: 280; top: 10px" src= "{% static 'images/1.png' %}">
        <img class="satellite" style="--i: 300; top: 20px" src= "{% static 'images/2.png' %}">
        <img class="satellite" style="--i: 320; top: 120px" src= "{% static 'images/3.png' %}">
        <img class="satellite" style="--i: 340; top: 20px" src= "{% static 'images/4.png' %}">
    </div>
</body>
</html>
○ test.css
body, html {
    margin: 0;
    padding: 0;
    height: 100%;
    height: 100vh;
    font-family: Arial, sans-serif;
    background: url('/static/images/background.png') no-repeat center center fixed;
    background-size: cover;
    position: relative;
    z-index: -1;
}

header {
    text-align: center;
    font-style: italic;
    font-weight: bold;
    margin: 20px 0;
}

header h1 {
    font-size: 3em;
    font-family: Arial, sans-serif;
    margin: 0;
}

.satellites {
    display: none;
    margin-top: 20%;
    align-items: center;
    /* border: 4px solid black; */
    animation: rotate-axis 10s linear infinite;
    transform-style: preserve-3d;
    display: flex;
    justify-content: center;
}

@keyframes rotate-axis {
    from {
        transform: perspective(800px) rotateY(0deg);
    }
    to {
        transform: perspective(800px) rotateY(360deg);
    }
}

.satellite {
    position: absolute;
    width: 100px;
    transform: rotateY(calc(var(--i) * 1deg)) translateZ(500px);
}
7. AWS 서버 배포
2024.08.14 - [Networks/aws] - SK networks AI Camp - AWS & Docker 연결
SK networks AI Camp - AWS & Docker 연결
AWS Instance 생성2024.08.13 - [Networks/aws] - SK networks AI Camp - VS Code 연동 및 Elastic IP 설정 connect host설치한 host로 누르기 But 연결 안 됨(이전에 Instance를 삭제하였기 때문)3. Instacne를 새로 만들어주기2024.08
joowon582.tistory.com
○ Docker File 생성 후 코드 복붙
FROM python:3.12 AS python-build
RUN pip install mysqlclient

FROM python:3.12-slim
COPY --from=python-build /usr/local/lib/python3.12/site-packages /usr/local/lib/python3.12/site-packages
RUN apt-get update && apt-get install -y libmariadb3 nginx

# 파이썬 모듈 설치
COPY requirements.txt requirements.txt
RUN pip install -r requirements.txt

# Nginx
COPY ./nginx/default.conf /etc/nginx/conf.d/default.conf

# Django server
RUN mkdir /app
COPY . /app
WORKDIR /app

# 환경변수 적용
ENV SECRET_KEY '본인 시크릿 키 사용' # 시크릿 키 : config/settings.py

COPY run.sh .
RUN chmod +x run.sh
CMD ["./run.sh"]
○ SECRET_KEY 설정
● config/settings SECRET_KEY, DEBUG, ALLOWED_HOSTS 수정
SECRET_KEY = os.getenv("SECRET_KEY")
# SECURITY WARNING: don't run with debug turned on in production!
DEBUG = False

ALLOWED_HOSTS = ['*']
● STATIC_ROOT = "/static/" 추가
STATIC_ROOT = "/static/"
STATIC_URL = "static/"
STATIC_PATH = os.path.join(
    BASE_DIR, "static"
)  # concatena a pasta static a variavel instanciada base_dir que aponta para a raiz do projeto

STATICFILES_DIRS = (STATIC_PATH,)
○ nginx 폴더 생성 후 default.conf 파일 생성
server {
    listen 80;
    server_name 0.0.0.0;

    root /app/static;

    location /static/ {
        alias /app/static/;
    }

    location / {
        proxy_set_header Host $host;
        proxy_pass http://0.0.0.0:8000;
        proxy_set_header X-Forwarded-For $proxy_add_x_forwarded_for;
    }

    access_log /var/log/nginx/access.log;
    error_log /var/log/nginx/error.log;

}
○ requirements.txt 파일 생성
● 터미널 pip freeze → pip freeze > requirements.txt
○ run.sh 파일 생성
python manage.py makemigrations
python manage.py migrate --no-input
python manage.py collectstatic --no-input

gunicorn config.wsgi:application --bind 0.0.0.0:8000 &

unlink /etc/nginx/sites-enabled/default
nginx -g 'daemon off;'
○ Docker Image 연결 후 nginx로 연결
docker build --platform linux/amd64 -t 아이디/이미지명 .
docker images

docker run --name django-container -d -p 80:80 joowon582/django-image
# 확인
docker ps
○ AWS ECR 접속 후 Repositories 생성
● Repository name 만 설정 후 Create
○ CodeBuild(설정 시 VSCode에 buildspec.yml과 같이 해줘야함)
● IMAGE_REPO_NAME : 이전에 입력한 Repository name
● ESC_CONTAINER_NAME : 컨테이너 이름 설정
● Project 생성 : 이름, Source(github), Repository 선택
● Environment : Role name 설정
● Use a Buildspec 선택(VSCode에서 생성한 파일 경로 그대로)
○ Git과 연동하기(Code Build)
● Connections : 이름 원하는 것 입력 → Install a new app → All Repository → Github Apps 키 생성
○ 권한 부여 (IAM) : EC2ContainerRegistryPowerUser 이 후 Build
○ Cluster 생성(ECS) : AWS Fargate 설정 및 이름 설정
○ Task 생성 (Task definitions)
● Container Name : VsCode에 buildspec.yml의 ECS_CONTAINER_NAME
● Image URI : ECR에서 생성한 Repository URI
○ Service 생성 (ECS → Cluster)
● Environment : Lanch type
● 이름 설정 및 Replica 선택
○ IAM → Security group → Inbound Roles에서 80포트 모두 추가
○ 접속 : Task(ECS)에 Public IP 실행
'Networks > Project' 카테고리의 다른 글
| SK networks AI Camp - ToyProject(AWS에 이미지 업로드 및 받아오기) (1) | 2024.10.17 |
|---|---|
| SK networks AI Camp - toyproject AWS 및 Github 트러블 이슈 (5) | 2024.10.17 |
| SK networks AI Camp - Toy Project 크롤링 코드(2) 및 전처리 리뷰 (0) | 2024.08.15 |
| SK networks AI Camp - Toy Project 전처리 코드 리뷰 (0) | 2024.08.11 |
| SK networks AI Camp - Toy Project 크롤링 코드 리뷰 (4) | 2024.08.10 |