Attributes 관련 함수
1. Attributes 추가
mesh.add_face_property<DATA_TYPE>("ATTR_NAME");     // face
mesh.add_vertex_property<DATA_TYPE>("ATTR_NAME");   // vertex
mesh.add_edge_property<DATA_TYPE>("ATTR_NAME");     //edge
mesh.add_halfedge_property<DATA_TYPE>("ATTR_NAME"); //halfedge
2. Attributes 접근
auto NAME = mesh.get_face_property<DATA_TYPE>("ATTR_NAME");3. Attributes 삭제
mesh.remove_face_property<DATA_TYPE>("ATTR_NAME");4. Attributes 존재 확인
mesh.has_vertex_property("ATTR_NAME");
Face Normal VS Vertex Normal
- Flat Shading : 각 face의 법선벡터를 계산해 사용
- Smooth Shading : 각 vertex의 법선벡터를 인접한 face들의 법선벡터의 평균으로 사용
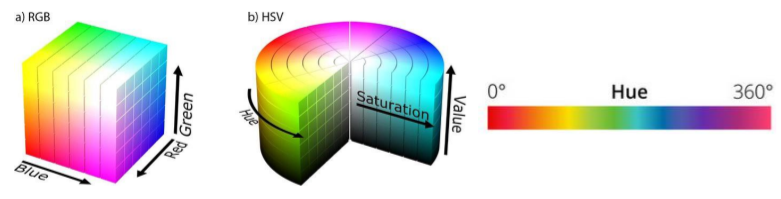
HSV: Hue(색상) + Saturation(채도) + Value(명도)로 색을 표현하는 방법
- Hue : 가시광선 스펙트럼 내에서 가장 파장이 큰 빨강을 0으로 하였을 때의 상대적인 배치각도
* 360도 빨강을 표현
Attributes 활용 Vertex tagging
- 특정 idx를 가진 정점의 v:index를 0으로 설정
- Mesh 구조를 따라 정점을 탐색하면서 1씩 증가
- GetVertexColor() : idx 최대값과 현재 idx를 비교해 색 결정 (HSV => RGB)
void DrawComponent::CalIDX(int idx)
{
#ifdef CASE_2_
	if(!mesh has_vertex_property("v:index"))
    	mesh.add_vertex_property<int>("v:index");
    auto vi = mesh.get_vertex_property<int>("v:index");

    for (auto v : mesh.vertices())
    	vi[v] = -1;

    vi[pmp::Vertex(idx)] = 0;

    while(true) {
    	boll isChanged = false;
        for(auto v : mesh.vertices()){
        	if(vi[v] => 0){
            	for(auto nv : mesh.vertices(v)){
                	if(vi[nv] == -1){
                    	vi[nv] = vi[v] + 1;
                        isChanged = true;
                    } //if end
                } //for end
             } //if end
         } //for end

         if(!isChanged)
         	break;
    }

    int maxIdx = -1;
    for(auto v : mesh.vertices())
    	maxIdx = std::max(maxIdx, vi[v]);

    // colorize vertices based on index(with hsv)
    if(!mesh.has_vertex_property("v:color"))
    	mesh.add_vertex_property<pmp::Color>("v:color");
    auto vc = mesh.get_vertex_property<pmp:Color>("v:color");

    for(auto v : mesh.vertices()){
    	vc[v] = GetVertexColor(vi[v], maxIdx);
    }
#endif
}
Remove by faces
- 0번 인덱스를 가지는 정점을 가지는 face를 removeFaces에 삽입
- removeFaces에 포함된 face들을 순회하면서 제거: delete_face()
- 가비지 컬렉션 실행 : 지워질면과 관련된 요소 실제 제거
#ifdef CASE_3_
	std::set<pmp::Face> removeFaces;
    pmp::Vertex startV(0);

    for(auto f : mesh.faces(startV))
    	removeFaces.insert(f);

    for(auto f : removeFaces)
    	mesh.delete_face(f);

    mesh.garbage_collection();
#endif
Remove by Vertices
- 0번 인덱스를 가지는 정점과 연관 있는 Vertex들을 removeVertices에 삽입
- removeVertices에 포함된 정점들을 순회하면서 제거 : delete_vertex()
- 가비지 컬렉션 실행 : 지워질 정점과 관련된 요소 실제 제거 => Mesh 구조 유지를 위함
#if defined CASE_4_ || defined CASE_5_
	std::set<pmp::Vertex> removeVertices;
    pmp::Vertex startV(0);

    for(auto v : mesh.vertices(startV))
    	removeVertices.insert(v);

    for(auto v : removeVertices)
    	mesh.delete_vertex(v);

    mesh.garbage_collection();
#endif
}
Boundary Detection
- mesh.is_boundary(v,e,he,f) : 요소가 경계인지 확인한 후 Boolean 반환
#if defined CASE_5_
	for(auto f :mesh.faces()){
    	glNormal3dv(fn[f].data());

        if(mesh.is_boundary(f))
        	glColor3f(1, 0, 0);
        else
        	glColor3f(1, 1, 1);

        DrawFace(&mesh, f);
    }
#endif
'컴퓨터 공학 > Graphics' 카테고리의 다른 글
| 은면 제거 (2) | 2024.06.12 |
|---|---|
| Texture Mapping (0) | 2024.06.12 |
| 3차원 그래픽스의 투영과 카메라 적용 (0) | 2024.06.12 |
| Traverse a Mesh with the half-edge structure (0) | 2024.06.12 |
| XR 콘텐츠를 위한 3D 모델 (2) | 2024.06.12 |